Knit Tensegrity Shell

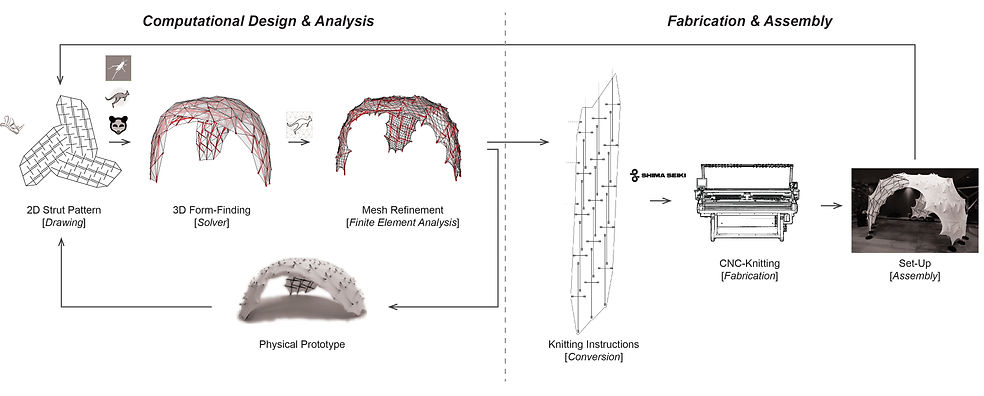
Knit Tensegrity Shell is a project investigating tensegrity structures that use a membrane made from knitted fabric as the tensile element. To materialize such ultralightweight structures, a design-to-fabrication workflow was developed that integrates 1) a simplified, simulation-driven design method for membrane tensegrity shells and 2) computer-assisted conversion of computer-aided design geometry into CNC knitting software data. Reciprocal strut patterns were parameterized for fluid exploration of various tensegrity shell configurations using a form-finding approach via a dynamic relaxation algorithm, which was further augmented with optimization tools to negotiate between structural performance and fabrication constraints. The tensegrity shell’s geometry was then digitally processed in preparation for fabrication on a CNC knitting machine. CNC knitting technology allowed for the tensegrity membrane to be knitted from different types of yarn to vary the stiffness of the membrane in response to stress concentrations, and knitted with multiple stitch types to integrate pockets to hold the compressive struts and customise the shape of the membrane. This workflow enabled flexible and streamlined production of membrane tensegrity shell structures without requiring computationally costly or rigorous simulations. Its efficacy was demonstrated with a human-scale pavilion that was exhibited at the International Association for Shell and Spatial Structure’s Form&Force Expo 2019 held in Barcelona.
All media property of the Dynamic Assemblies Lab

Because membrane tensegrity structures are form-active systems, a form-finding approach to model the structures using dynamic relaxation in Kangaroo Physics was implemented. This process enabled fluid exploration of shell forms by adjusting the 2D strut pattern, stretching parameters, and support conditions.
The strut patterning and form-finding process was informed by and calibrated with physical models. The Kangaroo form-finding parameters were adjusted using measurements of length, height, and radius of curvature of 3D scans of knit shell physical models with generic strut patterns.
Design-to-fabrication workflow for knit tensegrity shell structures
Form-finding process for tensegrity shells

Comparison of physical, 3D-scanned, and form-found calibration models
Struts were reciprocally patterned parametrically using Grasshopper in consideration of their lengths, spacing, angle and quantity within a bounding area which represents the outline of each ‘petal’ of the membrane. Besides the structural performance of the strut tessellation pattern, two major fabrication constraints based on the knitting machine used in this research had to be factored in the pattern search for human-scale prototypes of knit tensegrity shells. To satisfy these fabrication criteria while still achieving the design intent, the form-finding tool was augmented with the Opossum optimization plugin in Grasshopper to tune the strut patterning. The objective criterium was defined as the sum of the number of intersections between course-wise (pink) lines aligned with the upper/lower edges of the pockets (green rectangles) and the deviation in petal width from 1.25m. Opossum is instructed to minimize this value (i.e. reach zero intersections and under 1.25m width). After as little as 300 iterations, the Opossum solver could successfully adjust the strut pattern to satisfy these fabrication requirements for the workflow to proceed.

Strut patterning tool

Fabrication constraints for CNC knitting
Once the desired shell geometry was obtained from the form-finding simulations and validated for fabricability, the flattened geometry of a single petal was scaled in Grasshopper to match the exact number of stitches/pixels in the knitting machine’s software that corresponded to the required physical dimensions. Next, 2D points that specified the outline of the flattened membrane and positions of the strut ends were extracted and converted into the shaped membrane’s main body and pockets, respectively. This was implemented via a Clojure script which generated a compressed pattern that was readable by the knitting machine’s proprietary software. The compressed pattern specified the stitch type and input yarn materials for every part of the knitted fabric, and then the compressed pattern was combined with a library of instructions (base packages) to generate the knitting machine instructions.


Translation of CAD geometry to knitting machine input
Variation of knitting material and stitch type in the membrane
The final shell design comprised of three radially symmetrical petals patterned with 15 strut units each. A total of 90 struts were used, with the course-wise struts being 890mm long and the wale-wise struts being either 1510mm or 1710mm long. This shell design was chosen for its ability to achieve large openings while maintaining structural stability. The entire shell was rationalized as an assembled installation anchored to the ground at nine strut ends by 3D-printed conical base footings. These bases were further weighted down to secure the structure and resist accidental lateral forces on the pavilion.

Final strut pattern
.jpg)
Axonometric view of the assembly details
During assembly, the membrane was placed on the ground and the struts were inserted starting with the innermost strut units and ending with the outermost strut units that interface with the base footings. Once all the struts were inserted, the entire membrane was flipped over and the nine struts at the edges were inserted into the base footings. The strut insertion took approximately 40mins with 8 people working simultaneously. The entire assembly process can be completed in 2 hours. After being displayed at the IASS Form&Force Expo in Barcelona, the installation was moved to Seoul for a workshop and then to the library of the Singapore University of Technology & Design.


Pavilion installation
-01.jpg)